
A timesheet groups the work you do for a client or project, its hourly rate and the time you record against it. The sidebar calls them Timesheets. The pictures in this guide use example data.
Create a timesheet
- Select Timesheets in the sidebar.
- Select Create Timesheet.
- Enter a Timesheet Name. Add a Description (Optional) if you want one.
- Choose a Client (Optional) and Project (Optional) if the work belongs to one.
- Enter an Hourly Rate. It must be greater than zero. Add Estimated Hours (Optional) if you plan the work.
- Select Create Timesheet.
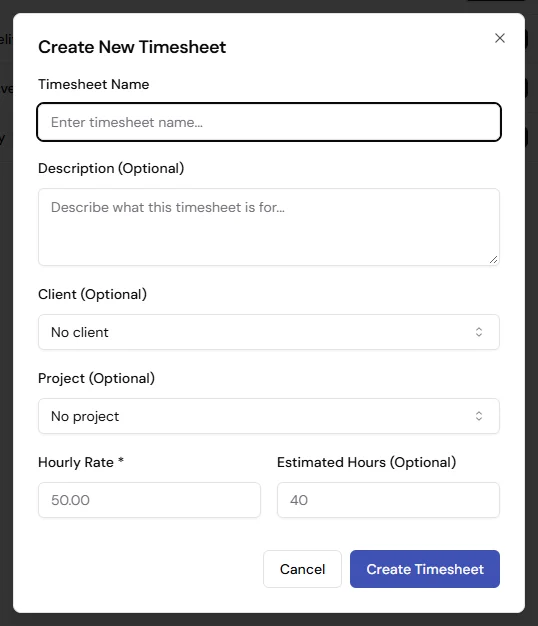
Figure 1. A name and an hourly rate are required.
Find your timesheets
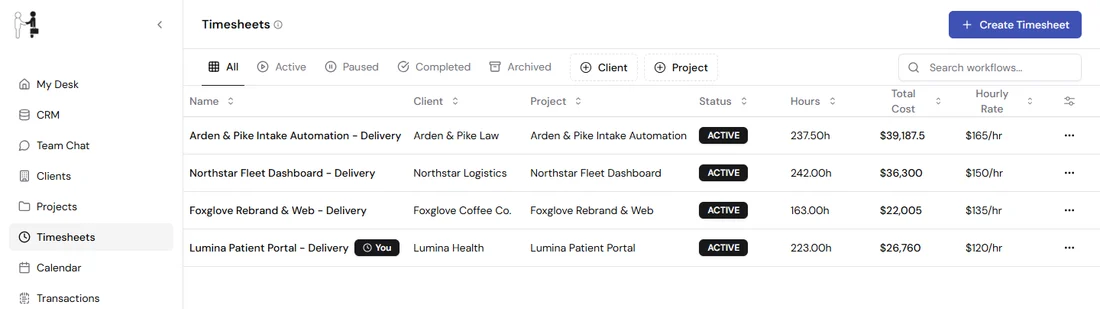
Figure 2. Each row shows the client, project, status, hours, total cost and hourly rate.
- Use All, Active, Paused, Completed and Archived to filter by status.
- Use Client and Project to narrow the list. Reopen a filter and select Clear filters to remove it.
- Type in Search workflows... to search by name or description.
- Select a column heading, such as Name or Hours, to sort. The icon at the end of the header lets you hide or show columns.
- Use rows per page and the arrows at the bottom to move through the list.
A You badge next to a name means you have a timer running on it.
Edit, pause, archive or delete
Select the three-dot menu at the end of a row.
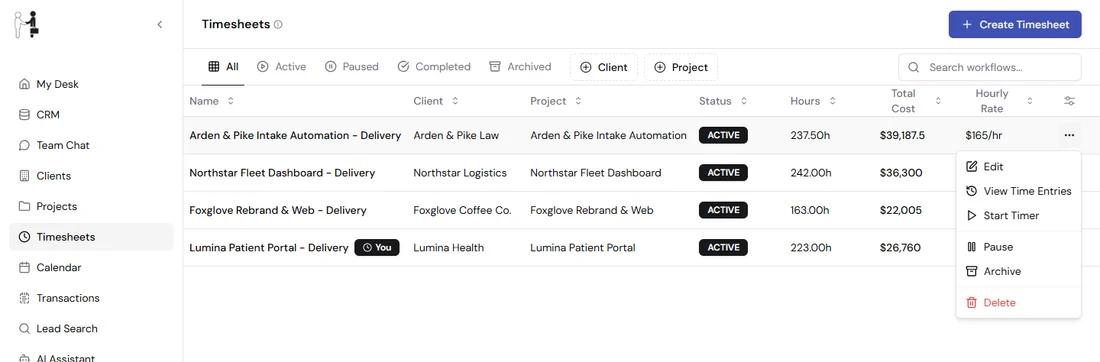
Figure 3. The menu changes with the timesheet's status.
- Edit: change the name, description, hourly rate or estimated hours, then select Update Timesheet. Changing the rate here does not change the rate on time you have already recorded.
- View Time Entries: opens the Time Tracking page for this timesheet.
- Start Timer: starts a timer on this timesheet straight away, with the work type Development. No page opens. While your timer runs, it reads Timer Running and cannot be selected.
- Pause and Resume: move the timesheet between Active and Paused.
- Archive: put it away under Archived. Its time stays in your records.
- Delete: permanently removes the timesheet and its time entries. This cannot be undone. Income and expense records that were created from billable time stay in Transactions, so remove them there if you do not want them.
You cannot archive or delete a timesheet while a timer is running on it. Archiving shows an error message, and deleting shows Failed to delete timesheet. It may have active time entries. Clock out, then try again.
Run a timer
- Open the timesheet's row menu and select View Time Entries. This opens the Time Tracking page.
- Choose a Timesheet and a Work Type, such as Development, Meeting or Research.
- Add a Description (Optional) of what you are working on.
- Select Start Timer.
- Select Break to pause and Resume to carry on.
- Select Clock Out when you finish.
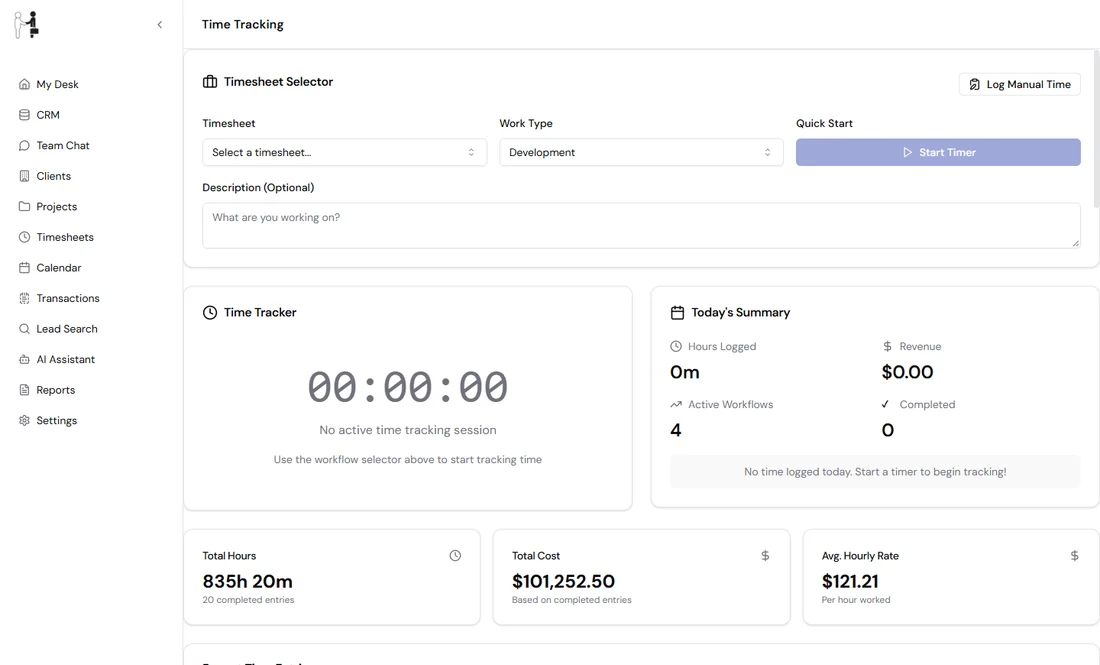
Figure 4. Pick a timesheet and work type, then start the timer.
You can have only one timer running at a time. If you try to start another you see You already have an active time entry. Please clock out first. When you clock out, the entry appears under Recent Time Entries. Timer entries are billable, so if the cost is more than zero, HireOrSell also creates an Income record in Transactions. Today's Summary shows the hours and revenue logged today, and the cards below it total your completed entries.
Add time by hand
If you forgot to start a timer, select Log Manual Time.
- Choose the Timesheet and Work Type.
- Set the Date, Start Time and Hours.
- Add a Description.
- Leave Billable time checked if the time should be charged. Choose a Transaction Type: Income if you are billing a client, or Expense if you are paying for the hours.
- Select Log Time.
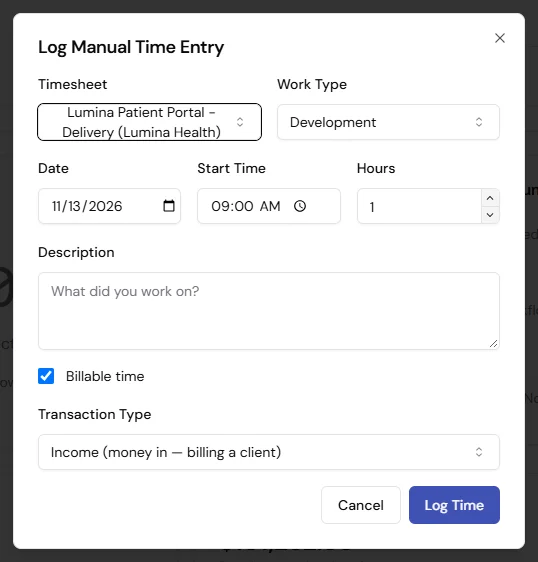
Figure 5. Billable time creates an income or expense record.
When time is billable and its cost is more than zero, HireOrSell creates a matching record in Transactions. If the time is not billable, or the rate is zero, no record is created.
Change or delete a time entry
In Recent Time Entries, open an entry's Open time entry actions menu.
- Edit: change the date, start time, hours, work type, description or Hourly Rate ($), then select Save Changes. The timesheet cannot be changed. The linked income or expense record updates with the entry.
- Delete: asks you to confirm, then removes the entry and its linked income or expense record.